I had a request from my best friend's mom awhile back to donate something to an upcoming raffle. I figured I would make a pallet sign, which are pretty easy to do but always sell well. The raffle is part of American Heros' Ride, so I decided to make a pallet flag. I've never actually made one before either and I thought it would be fun to try. I really love how it turned out so I'm sharing it with you today.
Showing posts with label Aubusson Blue. Show all posts
Monday, September 9, 2013
Friday, August 30, 2013
Love You More Chunky Sign
Chunky frames. I love them. And I don't find nearly enough of them. So, sometimes I just create my own, like this litlte guy!
Labels:
art,
Aubusson Blue,
burlap,
chalk paint,
decor,
frame,
graphite,
repurposed,
shabby,
signs,
upcycled
Wednesday, August 28, 2013
The Chalkboard with a Magnetic Personality
I found this cheval mirror frame at an auction. There was no mirror in it when I bought it, unless one small shattered piece in the bottom corner counts. The frame itself was in good shape, so I snagged it up for a steal, just knowing it would be a great upcycle project!
Labels:
aqua,
Aubusson Blue,
auctions,
CeCe Caldwell Paints,
chalk paint,
chalkboard,
decor,
Furniture,
Kentucky Mint,
magnetic,
makeover,
metal,
old white,
repurposed,
Santa Fe Turquoise,
shabby,
upcycled
Thursday, August 22, 2013
Shabby Little Shelves
This little shabby shelf was once just a lowly frame with an ugly picture and a broken mirror. And now it's a fabulous blue shelving unit! The mirror wasn't originally broken, but I broke it when I removed it from the frame. Oops. I guess it's seven year's bad luck for me. Now, isn't that just great! :)
But enough about my misfortunes. On to the project.
Monday, August 19, 2013
Industrial Cabinet Goodness!
Some of my favorite decor pieces are industrial. I just love the look of metal and wood together in perfect harmony. And, if you ask me, we don't do nearly enough of them! But I'm sharing one with you today that I hope you like!
Labels:
Aubusson Blue,
cabinet,
chalk paint,
decor,
drawers,
duck egg,
Emerald Isle Green,
hardware,
industrial,
junk,
metal,
repurposed,
rusty,
stained,
upcycled,
wood
Lowell, Mich
Lowell Township, MI 49331, USA
Tuesday, August 13, 2013
Chippy Dresser with Hinged Front
Today I'm sharing my first chippy piece of furniture with you. I really love the chippy look, but I've never tried my hand at it before. I really like the way it turned out and I hope you do too! Let's have a peek, shall we...
Wednesday, June 12, 2013
Scalloped Edge Table
I just love the character that this little table has!
The scalloped edges and the small finials on the corners area bit different than what you normally see on furniture.
Friday, May 10, 2013
A Custom Mother's Day Gift
In honor of Mother's Day, I wanted to share with you this custom sign we made for a friend of mine.
She sent me the poem a while ago and asked if we could make something rustic for her Mother in Law.
Yeah... we do rustic. :)
I first laid the poem out in Adobe Illustrator to set the text up in a pleasing way.
Then I cut a stencil.
I painted the leftover banner material with ASCP Old White and then Coco, adding some dark wax over that. I normally don't put wax on this material, but I just love Coco with dark wax on it.
Next I laid out the stencil and painted the serif text in Graphite and the script in Aubusson Blue.
That part was done.
Next up, Eric made a frame with pallet wood. I asked him to make it slightly larger than need be so I could put a burlap matte around the canvas.
I stained the frame and, once dried, measured my burlap out and cut it, also cutting the inside portion out to about the size I wanted it. I then placed it on the back of the frame, making sure to check to flip it over before stapling to be sure it was relatively straight along the inside edge of the frame. I stapled it onto the back at the corners. Then I added the banner, stapling that, along with the burlap, along the whole edge all the way around. I trimmed up the inside of the burlap then, just to straighten the line a bit.
My friend thinks her Mother in law will love it.
I certainly hope so!
I'm happy with the burlap matte.
I had never tried it before but it turned out really cute.
Happy Mother's Day to all of you!
Hope you have a great one!
Labels:
Aubusson Blue,
burlap,
chalk paint,
coco,
decor,
design,
DIY,
frame,
old white,
pallet,
phrase,
repurposed,
stained,
wood
Wednesday, March 27, 2013
Make a Wish (wall hook)
Here is another one of the little pretties we debuted with our repurposed shutters the other day.
A cute little pallet board hook for the wall.
This project was easy as pie (which sometimes isn't really all that easy, depending on the pie. lol)
I found some pallet wood pieces in Eric's scrap bin last week. I picked some that were just about the same length and I glued and nailed them onto a vertical 4th piece of scrap wood on the back.
I love pallet wood because it always has nail or staple holes, gouges and miscellaneous flaws.
It's always so perfectly imperfect!
Once everything had dried, I simply painted on some Annie Sloan Barcelona Orange, then a little Ce Ce Caldwell's Johnston Daffodil and finally some Santa Fe Turquoise. I didn't distress a thing, just painted it quickly, hitting and missing wherever I felt like it.
I just happened to have a few stencil letters that I cut apart and placed randomly and a little crookedly onto the board. Then used Aubusson Blue for the lettering.
I used Barcelona Orange again on a double-hook I had lying around in my pieces/parts box.
Finally I added clear wax to everything, then attached the hook under the lettering (and dabbed some paint on the screw heads too) and a little twine hanger off the back.
This little board matches our new shelf perfectly.
Can you tell by my color choices lately that I am SO ready for spring? :)
(pssst.... I'm going to tell you more about those cute metal and felt flowers and the little repurposed vases later this week, so be sure to stop back by!)
If you haven't liked our facebook page yet, you can do that here.
And you can follow me on Pinterest with this link.
To get my new posts at bloglovin', just click this.
Have a great day!
Labels:
aqua,
Aubusson Blue,
Barcelona Orange,
CeCe Caldwell Paints,
chalk paint,
decor,
DIY,
hook,
Johnston Daffodil,
paint,
pallet,
phrase,
repurposed,
rustic,
Santa Fe Turquoise,
shabby,
wood
Tuesday, March 26, 2013
A Chalkboard in Bloom
Today I wanted to tell you a little bit more about our spring chalkboard that was hanging next to our new mail holder made from a shutter that I shared yesterday.
This little goodie was already a chalkboard. But, the surface was pretty much shot. You just couldn't write on it anymore.
We had this particular item donated to us by a woman who saw us at our very first show and loved our stuff. She just so happened to have a few things in her car that she was planning on taking to Goodwill that day. Instead, she brought them back to our booth and made a donation to On A Whim!
People can be so nice :)
All I did for this piece was paint the chalkboard itself with Ce Ce Caldwell's Emerald Isle and then I used Annie Sloan Aubusson Blue on the frame and dry brushed some Ce Ce's Santa Fe Turquoise over that. I love the effect!
I printed some letters off of my computer and cut around them. I then cut 3" x 3" squares out of some springy-green scrapbook paper I had and made them into triangles. I glued the letters onto those and I attached the flags to a piece of teal yarn I had picked up somewhere in a free bin with some blue flower brads I had laying around in my scrapbook stash.
I just love the combination of blue and green, don't you? :)
Wednesday, March 20, 2013
Faded Denim End Table Redo
This is our latest furniture makeover. I'm calling it Faded Denim because that's what the colors and dry-brushing effect reminds me of... a comfy pair of blue jeans. :)
I picked up this little beauty at our local thrift store for only $6. It was originally $12 but I just so happened to be there on 1/2 price day. Lucky me!
Here is the table before any paint. The table was very sturdy, but I did sand the tops down because there were various scratches and dents in them and I thought a complete sand-down of those areas would be good for this project.
And here she is after a coat of both colors.
I used Smokey Mountain, which is the lighter color, and Aubusson Blue. Smokey Mountain is a Ce Ce Caldewell's greyish-blue color that I really liked against the Aubusson.
I had originally decided to paint this with Old White and Smokey Mountain. This was my first time using Smokey Mountain, though, and once I got it on, I couldn't help but change my mind about the Old White and use Aubusson instead. It's one of my favorite colors and I knew I would love these 2 together!
I painted Aubusson under the Smokey Mountain and vice-versa on some areas. I also dry brushed the Smokey over the Aubusson. I really like how that turned out. 

I had intended on using Aubusson in the grooves only. But I decided to paint the entire insets on the top, around the backs of the legs and the underside of the table too.
(Pay no attention to the upside down no. 5 in the background there. The kids' bookcase is over that way!)
I distressed some of the Smokey Mountain off to reveal the Aubusson and then added more distressing all over to let the wood show through a bit.
I think she'll make a very nice vintage side table for someone's home. :)
Everyone loves a good party!
Check my project out along with other great inspiration, at these great blogs...
Masterpiece Monday at Boogieboard Cottage, Mop It Up Monday at I Should Be Mopping the Floor, Make the Scene Monday at Alderberry Hill, Pink Hippo Party at Pinkapotamus, Monday No Rules Blog Hop at A Sorta Fairytale,Just Something I Whipped Up at The Girl Creative, Metamorphasis Monday at Between Naps on the Porch, Making the World Cuter Monday, Before and After at Thrifty Decor Chick (first Monday of the month), What's in the Gunny Sack at the Gunny Sack, Make It Pretty Monday at The Dedicated House, Mod Mix Monday at Mod Vintage Life, Budget Decorating Party at Creative Cain Cabin, That DIY Party at DIY Showoff
One Project at a Time at A Bowl Full of Lemons, Transformation Tuesday at The Ironstone Nest, Monday Funday at Creatively Living, Nifty Thrifty Tuesday at Coastal Charm, The Scoop at Cedar Hill Ranch, Project Inspired{d}at Cupcakes and Crinoline, You're Gonna Love It at Kathe with an E, Transformed Tuesdays at PJH Designs, Tweak It Tuesday at Cozy Little House, Take a Look Tuesday at Sugar Bee Crafts, Primp Your Stuff Wednesday at Primp Junktion, Be Inspired at Elizabeth and Co, Pretty Things Link Party at twelveOeight, Time to Shine at A Diamond in the Stuff, Too Cute Tuesday at Funky Polkadot Giraffe, The Power of Paint Party at Domestically Speaking, Creatively Tuesday at The Rustic Pig, Show Me What You Got at Not Just a Housewife, Share It Link Party at The Winthrop Chronicles, Tasteful Tuesday at Naptime Creations, Tutorial Tuesday at Hope Studios, Trash 2 Treasure at Kammy's Korner, Fluster's Creative Muster Party at Fluster Buster, The Creative Spark at Clean and Scentsible
Wildly Original Link Party at I Gotta Create, Wow Us Wednesday at Family Home and Life, Whatever Goes Wednesday at Someday Crafts, Whimsy Wednesday at Smart School House, What's It Wednesday at Ivy and Elephants, Wednesday Whatsits at White Lights on Wednesday, What We Accomplished Wednesday at Green Willow Pond, Under $100 Linky Party at Beyond the Picket Fence, Show and Share at Southern Lovely, Wow Us Wednesdays at Savvy Southern Style, Wow Me Wednesday at Gingersnap Crafts, From Dream to Reality at The DIY Dreamer, Its' a Party! at A Creative Princess, Show Off Your Stuff Party at Fireflies and Jellybeans, Look What I Made Wednesday at Creations by Kara, Create and Share at The Trendy Treehouse
Party Time at The 36th Avenue, Home Sweet Home at The Charm of Home, Transformation Thursday at The Shabby Creek Cottage, Share Your Cup Party at Have a Daily Cup of Mrs. Olson, Hookin' Up with HOH at House of Hepworths, Talkin' about Thursday at Designed Decor, Live Laugh Linky at Live Laugh Rowe, Home and Garden Thursday at A Delightsome Life, The Inspiration Gallery at Craftberry Bush, Made U Look Linky at Made in a Day, Creative Things Thursday at The Vintage Farmhouse, Catch as Catch Can at My Repurposed Life, Time Travel Thursday at The Brambleberry Cottage, Catch a Glimpse Party at A Glimpse Inside, 52 Mantels, Creative Inspirations Linky Party at Embracing Change, Creative Things Thursday at The Vintage Farmhouse
Simply Creations Link Party at My Simple Homelife, Furniture Feature Friday at Miss Mustard Seed, Inspire Me Please Link Party at Liz Marie Blog, Frugal Friday at The Shabby Nest, Feathered Nest Friday at French Country Cottage, What Have You Redone at Redoux Interiors, Home Sweet Home at The Charm of Home, Thrifty Things Friday at The Thrifty Groove, Simple and Sweet Fridays at Rooted inThyme, Be Inspired at Common Ground, Faunt It Friday at Chic on a Shoestring Decorating, Frugalicious Friday at Finding Fabulous, Fabulously Creative Friday at Jennifer Rizzo, Show and Tell Friday at Romantic Home, Junkin' Joe Vintage and Thrifty Finds at The Cottage Market, Weekend Wrap-Up Party at Tatertots and Jello, Shabbilicious Friday Link Party at Shabby Art Boutique, Tickled Pink at 504 Main, Anything Blue Friday at The Dedicated House
Saturday Show and Tell at Cheerios and Lattes, Saturday Nite Special at Funky Junk Interiors, A Bouquet of Talent Party at Life on Lakeshore Drive, Strut Your Stuff Party at Six Sisters' Stuff, Show and Tell Saturday at Sassy little Lady, Get Schooled Satuday at Too Much Time on My Hands, Power of Pinterest Party at Fox Hollow Cottage, Your Great Idea Party at Or So She Says, Overflowing with Creativity party at It's Overflowing, Craft Country Cottage Party at Old Red Barn
The Sunday Showcase Party at Under the Table and Dreaming, Sunny Simple Sundays Party at Sunny Simple Life, Sundae Scoop at I Heart Naptime, Think Pink Sundays at Flamingo Toes, Nifty Thrifty Sunday at Nifty Thrifty Things, It's Party Time at Three Mango Seeds, Restyled Sundays at Stylish Once Again, Silver Pennies Sundays at Silver Pennies, Frugal Crafty Home Blog Hop at A Blossoming Life
Labels:
Aubusson Blue,
CeCe Caldwell Paints,
chalk paint,
decor,
DIY,
Furniture,
makeover,
paint,
shabby,
table,
thrift,
upcycled,
vintage,
wood
Tuesday, February 19, 2013
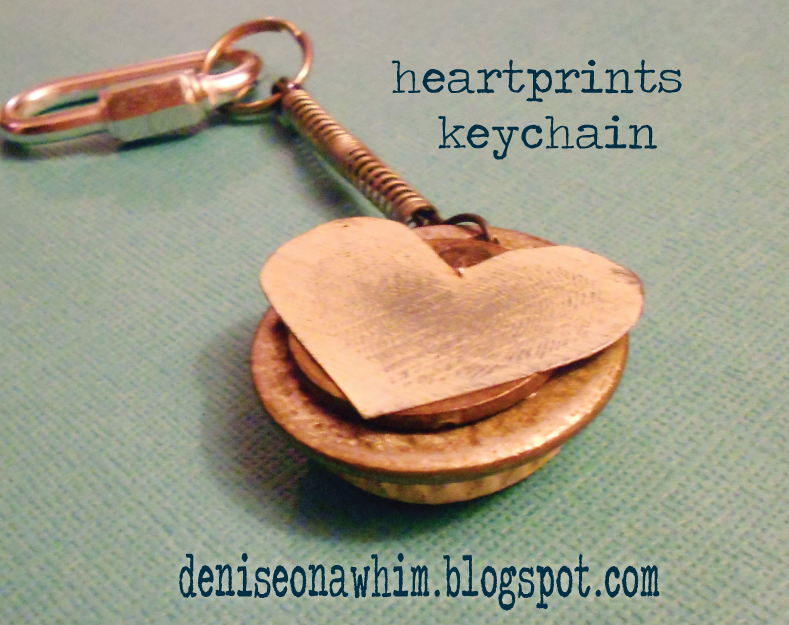
HeartPrints Keychain {for my love}
Buying gifts for a man can sometimes be way-difficult! Making them is sometimes even more of a challenge because, let's face it, I'm a girl and I like pretty things. It's sometimes difficult to not get too carried away with the cutesy and lean more toward the manly. But, I thought I'd give it another try after my
to Eric turned out so well!
I saw this really great pendant made from clay on Pinterest. It was so cool (here's the link to her post), but I knew I wouldn't have a chance to make it to the store for any clay. So, what's a girl to do...?
Get creative, of course!
I pulled out what I had at home, namely a few washers at different sizes and a tin can lid. I figured I would put my fingerprints on the can lid and then cut a heart around them. What I wasn't sure of, was what to use for the medium to transpose my fingerprints on.
I tried using fingernail polish painted on the metal, which worked (although it was a little messy for my fingers! lol) until I tried to cut the heart out, at which time it chipped off the tin. Hmmm.... what to try next?
Then I had a lightbulb moment. Chalk paint would work on the tin! So I painted one coat of Aubusson Blue on and then, over that, I used Old White and quickly made the fingerprints. It worked so well, showing off the blue where my prints were. Yay! So I put a coat of wax on the lid, then got the tin snips out and cut a heart around the 2 fingerprints.
The next thing to do was get out my drill and add a hole in the large washer so I could make this thing into a keychain. To be honest, I wasn't really sure if the bits I had were supposed to be used on metal, but I figured I'd give it a try. And it did indeed work. Another success! :)
I next got out my trusty JB Weld, attaching the 2 washers and the heart together and clamped it for a few hours. Things seemed to be going smashingly! But something was missing. It just didn't seem finished. So I grabbed a bottled cap to see if that would work somehow. Perfect fit for the back of the washer! I painted it with Chalk Paint as well, this time in Coco, and waxed it with dark aging wax. But it still needed something more...
I had though once about using metal stamps on this piece. But, they are really kind of a pain! lol. Instead, I printed out some words on plain paper, cut them out and used Mod Podge to attach them to the bottlecap and again over them to seal it.
I put a nut between the washer and the bottle cap and used the epoxy to weld those together too. Finally, I added some dark wire through the hole I had drilled and an old spring I had found when scrounging through my box of junk. I bent the wire back into the spring and used a little more JB Weld to hold it. Then I added a ring and it was done.
I was really happy with the way it turned out. Junky and totally repurposed. A bit manly (but still pretty!). All with a personal, unique-to-me touch. The perfect Valentine for my guy. And he thought so too :)
We're sharing at these great parties...
Nifty Thrifty Tuesday at Coastal Charm
Creatively Tuesday at The Rustic Pig
Tweak It Tuesday at Cozy Little House
Pretty Things Party at twelveOeight
Creatively Tuesday at The Rustic Pig
Tweak It Tuesday at Cozy Little House
Pretty Things Party at twelveOeight
Cowgirl Up! Party
Your Gonna Love It Linky Party at Kathe With an E
Transformed Tuesdays at PJH Designs
Take A Look Tuesday at Sugarbee Crafts
Be Inspired Linky Party at Elizabeth and Co
It's Party Time at Three Mango Seeds
From Dream to Reality at The DIY Dreamer
Wow Me Wednesday at Ginger Snap Crafts
Whimsy Wednesday at Smart School House
Tasteful Tuesday at Nap Time Creations
What We Accomplished Wednesday at Green Willow Pond
Show and Share with Southern Lovely
Wow Us Wednesday at Savvy Southern Style
Wednesday Whatsits at White Lights on Wednesday
Show Me What Ya Got at Not Just a Housewife
Under $100 Linky Party at Beyond the Picket Fence
Live Laugh Linky at Live Laugh Rowe
Home and Garden Thursday at A Delightsome Life
Made U Look Linky at Made In a Day
Transformation Thursday at The Shabby Creek Cottage
Hookin Up with HOH at House of Hepworths
Your Gonna Love It Linky Party at Kathe With an E
Transformed Tuesdays at PJH Designs
Take A Look Tuesday at Sugarbee Crafts
Be Inspired Linky Party at Elizabeth and Co
It's Party Time at Three Mango Seeds
From Dream to Reality at The DIY Dreamer
Wow Me Wednesday at Ginger Snap Crafts
Whimsy Wednesday at Smart School House
Tasteful Tuesday at Nap Time Creations
What We Accomplished Wednesday at Green Willow Pond
Show and Share with Southern Lovely
Wow Us Wednesday at Savvy Southern Style
Wednesday Whatsits at White Lights on Wednesday
Show Me What Ya Got at Not Just a Housewife
Under $100 Linky Party at Beyond the Picket Fence
Live Laugh Linky at Live Laugh Rowe
Home and Garden Thursday at A Delightsome Life
Made U Look Linky at Made In a Day
Transformation Thursday at The Shabby Creek Cottage
Hookin Up with HOH at House of Hepworths
Labels:
Aubusson Blue,
chalk paint,
coco,
DIY,
hardware,
hearts,
industrial,
junk,
love,
manly,
metal,
Mod Podge,
old white,
repurposed,
rustic
Wednesday, October 31, 2012
The Aubusson Blue Hutch Reveal
For whatever reason, the computer wouldn't read any pics on my camera the other day. But I got it to work today and I was finally able to grab the pics so I can post this awesome furniture reveal! Yay!
This is my friend's great hutch before we started working on it. She bought it at a bargain price and decided she didn't have the time (or possibly energy. lol) to redo this herself so she asked us to do the job for her. I was so excited at the color she chose: Aubusson Blue Annie Sloan Chalk Paint™
She wanted to use Old White underneath for the distressed areas. So I first set to work painting the edges and various other areas with Old White.
After the Old White was on, I got started on the Aubusson Blue. I love, love, love this color!! It's so gorgeous by itself, but once you get a little dark wax on it, it is even more perfect!
Like I've said before, Chalk Paint™ goes on like a charm and the whole hutch didn't take long to paint at all. And the distressing went really well, too. I distressed this one a bit more heavily than I did out last piece. I think I'm just feeling more and more comfortable with it as I go so the distressing isn't quite as daunting as it was on our first piece. Besides, the more I work with the paint and wax, the more I realize that it would be such an easy fix even if I didn't like a spot I distressed... just paint it right over the wax and go again. :) I also distressed it so that some areas had the wood showing too, while most areas have the Old White peaking through. I'm glad I did, because I really like the dimension that gave it.
We were supposed to deliver this yesterday, but the wind and rain got in our way. So we will be delivering it later this week. I sure hope Jen doesn't mind me sharing with you before she has this pretty thing in her hot little hands. But I just couldn't wait any longer! ;)
See this project at
Labels:
Aubusson Blue,
cabinet,
chalk paint,
decor,
Furniture,
makeover,
paint,
wood
Subscribe to:
Posts (Atom)